前言 本文为翻译文章。原文地址 https://www.learnopencv.com/face-detection-opencv-dlib-and-deep-learning-c-python/
在这篇文章中,作者讨论使用了OpenCV或Dlib的多种人脸检测的代码,并给出性能分析。作者使用的 Face Detector 包括以下四个,后面分别给出 c++ 和 python 实现。
- OpenCV 的 Haar Cascade Face Detector
- OpenCV 的 Deep Learning based Face Detector
- Dlib 的 HoG Face Detector
- Dlib 的 Deep Learning based Face Detector
作者限于篇幅没有对对理论进行深入解读,只讨论框架的使用,同时分享一些应用上的选择权衡的经验。
结论:在多数场景中,我们提前不知道图片大小,因此 选用 OpenCV – DNN 相当快也很精确,甚至对于小人脸也不错,各种人脸角度也可以。选用这个在大多情况下是最优的。
code FaceDetectionComparison 说明:为了使文章显得简洁一些,在文中只提供关键的代码片段。在github项目中详细代码,包括每个方法独立的代码和整合在一起的cpp和py文件(run-all.py 和 run-all.cpp),同时里面也有运行代码所使用的人脸检测模型。
¶1. OpenCV-Haar
在2001年,Viola 和 Jones提出Haar Cascade 特征为基础的 Face Detector,在以后的多年内都是最优的人脸检测算法。以他们的算法为基础人们做了很多改进。OpenCV提供了很多Haar特征的模型算法,更多的Haar特征模型 here
¶代码
¶Python
1 | faceCascade = cv2.CascadeClassifier('./haarcascade_frontalface_default.xml') |
¶C++
1 | faceCascadePath = "./haarcascade_frontalface_default.xml"; |
对图片灰度变化(grayscale)后,再应用 haar cascade 特征,输出是脸的list。list中每个item有四个element 分别为 top-left corner的(x, y) 、检测出来脸的大小(width, height) 。
¶优点
- 在CPU上几乎是实时的(real-time)
- 简单的框架 (Simple Architecture)
- 能检测不同大小的脸 (different scales)
¶缺点
- 主要缺点是有很多错误的预测(False predictions),会多预测出人脸。
- 人脸非正面效果不好 (non-frontal)
- 人脸遮挡效果不好 (under occlusion)
¶2. OpenCV-DNN
在 OpenCV 3.3 中引入这个方法。DNN模型使用SSD **Single-Shot-Multibox detector**框架和 ResNet-10 特征提取网络(backbone)。这个模型喂的数据是从网上采集的,但是训练的源代码没有公开。OpenCV提供了2个模型文件。
- Float 16 位版本模型,使用原始的 caffe 训练 (5.4 MB)
- 8 bit quantized 版本模型,使用 Tensorflow 训练 (2.7 MB)
代码 FaceDetectionComparison 里面放了这两个模型文件。
¶代码
¶Python
1 | DNN = "TF" |
¶C++
1 | const std::string caffeConfigFile = "./deploy.prototxt"; |
caffe 和 Tensorflow 框架加载模型的代码。使用 Float 16 的 Caffe 模型,需要 caffemodel 和 prototxt 文件。使用 8 bit quantized 的 Tensorflow 模型,需要 Tensorflow 配置文件和模型。
¶Python
1 | blob = cv2.dnn.blobFromImage(frameOpencvDnn, 1.0, (300, 300), [104, 117, 123], False, False) |
¶C++
1 |
|
在上面的代码里面,图像转为blob输入进network里,利用前向传播函数forward(),得到一个4-D matrix。 这里不是很理解,代码跑起来看一下???
- The 3rd dimension iterates over the detected faces. (i is the iterator over the number of faces)
- The fourth dimension contains information about the bounding box and score for each face. For example, detections[0,0,0,2] gives the confidence score for the first face, and detections[0,0,0,3:6] give the bounding box.
The output coordinates of the bounding box are normalized between [0,1]. Thus the coordinates should be multiplied by the height and width of the original image to get the correct bounding box on the image.
¶优点(merits)
- 在本文四个方法中最精确(Most accurate)
- 可以在CPU上实时运行(real-time)
- 人脸不同方向效果不错(上下左右,侧脸等)up, down, left, right, side-face etc
- 人脸不同大小效果不错哦(various scales, big and tiny OK)
OpenCV的这个DNN方法克服了 Haar cascade 方法的不足,同时精度也不比它差。暂时没有发现这个方法其他有不足地方,除了比后面的 Dlib HoG 方法速度慢一点以外。
作者建议,在使用OpenCV时,比Haar方法,可以优先考虑DNN方法。
¶3. Dlib-HoG
HoG 人脸检测方法被广泛的使用,基于 HoG 特征和 SVM 分类。作者还写了一篇 HoG 的博客 post。模型有5个 HOG filters 滤波器( front looking, left looking, right looking, front looking but rotated left, and a front looking but rotated right),模型直接放在了头文件里面 header file。
训练模型的数据库,来自LFW dataset,由 Davis King (Dlib的作者) 手工标记 (manually annotated)共2825张。需要的话,数据库从这里可以下载 dlib_face_detector_training_data.tar.gz.
¶代码
¶Python
1 | hogFaceDetector = dlib.get_frontal_face_detector() |
¶C++
1 | frontal_face_detector hogFaceDetector = get_frontal_face_detector(); |
在上面的代码中,首先加载 face detector,然后将图像输入给 detector 。其中第二个参数代表,想要上采样图片的倍数(times of upscale)。你给的数字越大,小脸检测出的概率越大。但是upscaling 会在计算上花费可观的时间( substantial impact on the computation speed)。输出是脸的list, 框框对角的坐标(diagonal corners)。
¶优点
- 在cpu上最快的方法(在四个方法中)
- 对正面和轻微非正面的方法效果很不错
- 模型比较少对于其他三个的文件来说
- 轻微遮挡下可以检测
大概以上,这个方法多数情况可以工作,除了下面的情况。
¶缺点
- 主要缺点对小人脸不识别。由于训练在最小 80×80 的数据集上,要确保你的使用环境,不然的话你要自己再训练一下小人脸。
- 人脸框经常去掉了人额头一部分,有时脸颊一部分。 (part of forehead and even part of chin sometimes)
- 在明显的遮挡情况下效果不好
- 在测量和极端不正面的脸情况不工作,像向上看,和向下看的情况。
¶4. Dlib-CNN
这个模型使用了**Maximum-Margin Object Detector (MMOD)** 加CNN的特征的方法。训练过程相当简单,也不需要大量的数据去训练一个新的 object detector。更多的训练套路,在这个网站上 website.
使用的模型可以从 dlib-models repository 下载。
训练使用的数据库是dlib的作者 Davis King 手工标的,7220张从 ImageNet, PASCAL VOC, VGG, WIDER, Face Scrub等数据库里面挑的。这个数据库可以下载到。dlib_face_detection_dataset-2016-09-30.tar.gz
¶代码
¶Python
1 | dnnFaceDetector = dlib.cnn_face_detection_model_v1("./mmod_human_face_detector.dat") |
¶C++
1 | String mmodModelPath = "./mmod_human_face_detector.dat"; |
代码和 HoG detector 差不多,除了下载的 CNN face detection 的模型文件。
¶优点
- 不同的脸朝向效果不错 (face orientations)
- 遮挡比较稳定 (occlusion)
- 在GPU上很快
- 训练模型过程很简单
¶缺点
- CPU上很慢
- 脸大小于 80×80 检测不出,因为模型在小脸训练的。所以要考虑你应用的具体场景脸的大小,当然也可以对小脸数据库再训练一下。
- 人脸框 bounding box 甚至比 HoG detector 还小。
¶5. 精度比较
(Accuracy Comparison)
作者评估这四个模型使用的是 FDDB 数据库,其中评估OpenCV-DNN 脚本为 OpenCV face_detector_accuracy.py.
作者发现奇怪的结果。Dlib 的结果比 Haar OpenCV还要低,然而实际从图片上效果比较好。下图是这四个方法的精度得分( Precision scores)。
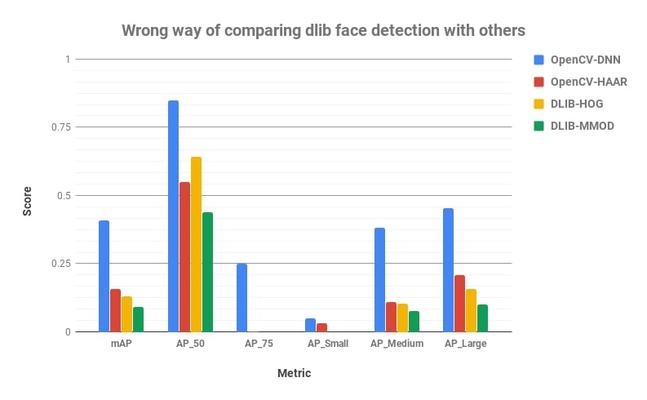
指标说明(Metric): AP_50 = Precision when overlap between Ground Truth and predicted bounding box is at least 50% (IoU = 50%) AP_75 = Precision when overlap between Ground Truth and predicted bounding box is at least 75% (IoU = 75%) AP_Small = Average Precision for small size faces (Average of IoU = 50% to 95%) AP_medium = Average Precision for medium size faces (Average of IoU = 50% to 95%) AP_Large = Average Precision for large size faces (Average of IoU = 50% to 95%) mAP = Average precision across different IoU (Average of IoU = 50% to 95%)
作者最近的发现评估过程对 Dlib 不够公平,科学。
¶5.1. 评估过程出错了,分析的二个原因!
根据我们的分析,Dlib拿到低的精度的原因如下: 第一个主要原因是训练dlib的是标准数据库没有加标签(annotations)。数据库图片是由dlib作者自己切的,因此可以发现同样是人脸检测的框,同OpenCV 中的两个方法 OpenCV-Haar 或者 OpenCV-DNN 相比,dlib的方法会裁掉额头一部分或者脸颊一部分(forehead chin)。下面的图中可以看到。


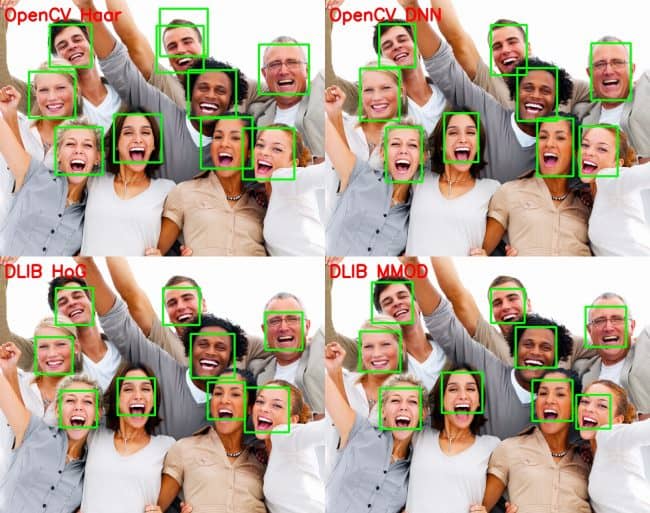
这个问题可以导致 在上个柱状图中 dlib 分数会低。AP_X 代表着 X% 预测框和真实框交叠的面积占合起来面积的比率。dlib 的 AP_75 的得分为0,尽管有在 AP_75 比 Haar 还高。这个就意味着:Dlib 模型可以预测更多的人脸比 Haar 特征,但是dlib的框的 AP_75 得分比较低。
第二个原因是 dlib 不能检测小的人脸,进一步拉低了得分。
因此,比较 OpenCV 和 Dlib 精确性的一个相对合理的指标是 AP_50 (或者可以使用小于50%的指标,我们只是设阈值用来计算人头的个数) 以上分析大家使用 Dlib 的时候注意一下。
¶6. 速度比较
Speed Comparison
我们使用 300x300 图像做的对比实验。Dlib 的 MMOD 模型可以利用上GPU,但是OpenCV方法对 NVIDIA GPUs 支持还没有。所以我们评估对比这些方法在CPU上,但我们也给出 GPU 版本 MMOD 结果。
(这段话以后写论文的时候可以用到,保留:cat:) We used a 300×300 image for the comparison of the methods. The MMOD detector can be run on a GPU, but the support for NVIDIA GPUs in OpenCV is still not there. So, we evaluate the methods on CPU only and also report result for MMOD on GPU as well as CPU.
¶硬件的配置
Processor : Intel Core i7 6850K – 6 Core RAM : 32 GB GPU : NVIDIA GTX 1080 Ti with 11 GB RAM OS : Linux 16.04 LTS Programming Language : Python
我们跑了10次,每次对图片进行10000趟测试得总时间,然后对这10次取平均。下面的柱状图是结果。We run each method 10000 times on the given image and take 10 such iterations and average the time taken. Given below are the results.

从图中可以看到,对于 300x300 的图片,除了 MMOD。MMOD 在GPU上还是很快的,CPU上就是渣渣了。As you can see that for the image of this size, all the methods perform in real-time, except MMOD. MMOD detector is very fast on a GPU but is very slow on a CPU.
以上的结果在不同电脑硬软件环境下可能不一样。
¶7. 多种情况讨论
除了速度和精度外,我们在选择哪个模型来使用还有一些因素可以考虑。在这节中,将考虑这些情况下的选择。主要为人脸大小变化、非正脸、遮挡。
¶7.1. 人脸大小变化
Detection across scale
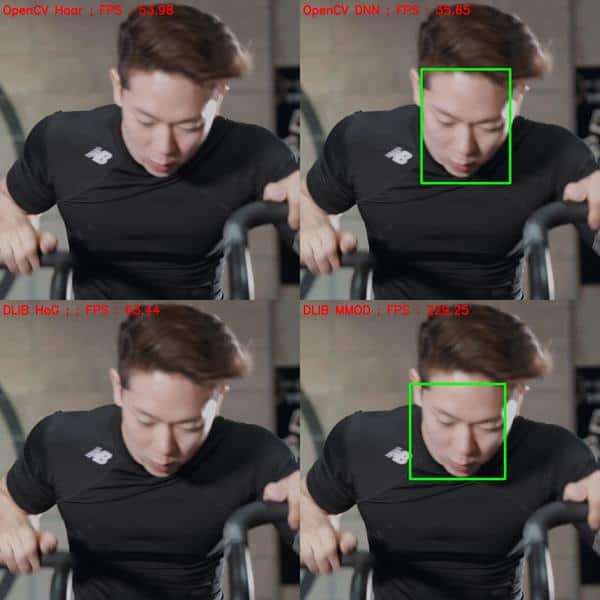
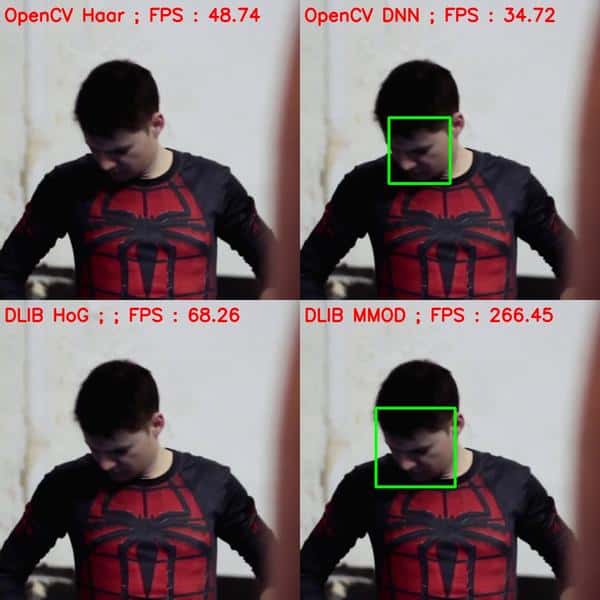
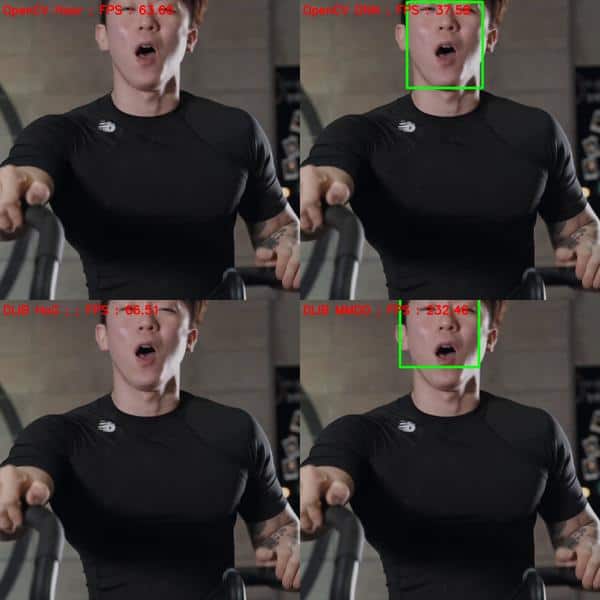
下面有一个例子视频,这位帅哥在做一个前后的健身动作,使得脸部区域变大变小。可以看到OpenCV DNN 检测出了所有的脸,而 Dlib 的方法只有在大于某个 size 的时候才被检测出来。

我们测试后,脸大于 70×70 才能被 dlib检测出。正如在前面说到的,对小人脸检测是dlib方法的一个大的缺点。我们也可以将图片上采样,但这样的话速度的话相对于 OpenCV-DNN 就太慢了。
It can be seen that dlib based methods are able to detect faces of size upto ~(70×70) after which they fail to detect. As we discussed earlier, I think this is the major drawback of Dlib based methods. Since it is not possible to know the size of the face before-hand in most cases. We can get rid of this problem by upscaling the image, but then the speed advantage of dlib as compared to OpenCV-DNN goes away.
¶7.2. 非正脸
Non-frontal Face
对于非正脸的测试,我们选用了 looking towards right, left, up, down。为了对 dlib 公平,我们选择了face 大于 80×80 的图片。下面是一些例子。
Non-frontal can be looking towards right, left, up, down. Again, to be fair with dlib, we make sure the face size is more than 80×80. Given below are some examples.

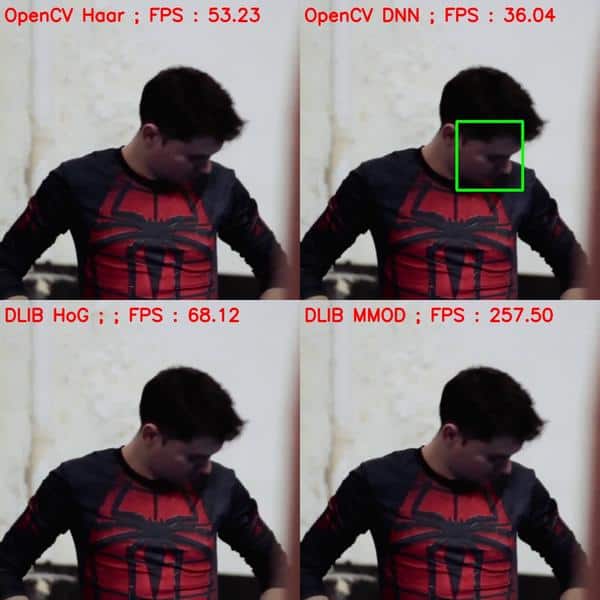
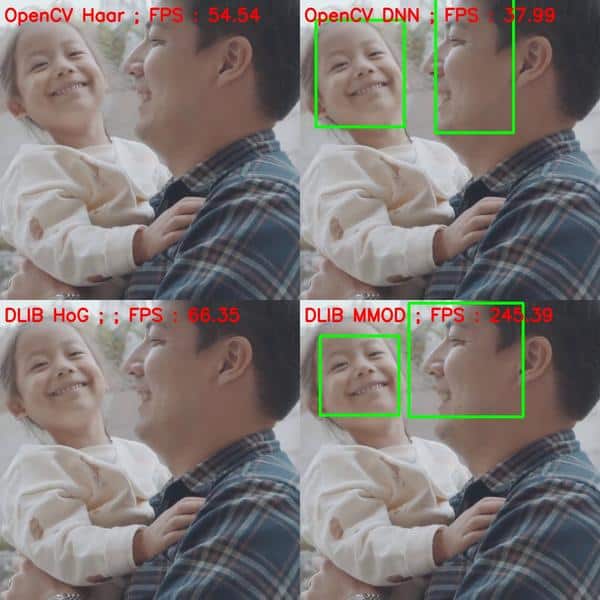
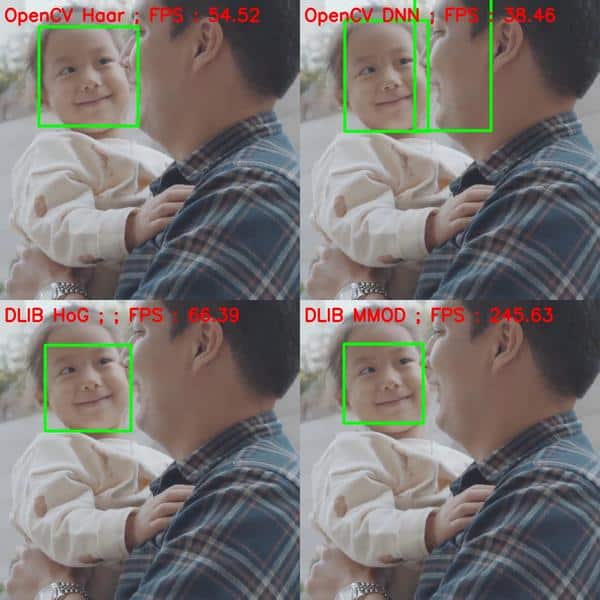
和预期的一样,OpenCV Haar 方法完全败了。Dlib HoG能检测出 left 或 right looking faces,但是精度不如那些DNN方法。
As expected, Haar based detector fails totally. HoG based detector does detect faces for left or right looking faces (since it was trained on them) but not as accurately as the DNN based detectors of OpenCV and Dlib.
¶7.3. 遮挡
Occlusion
接下来看一下遮挡的情况。Let us see how well the methods perform under occlusion.
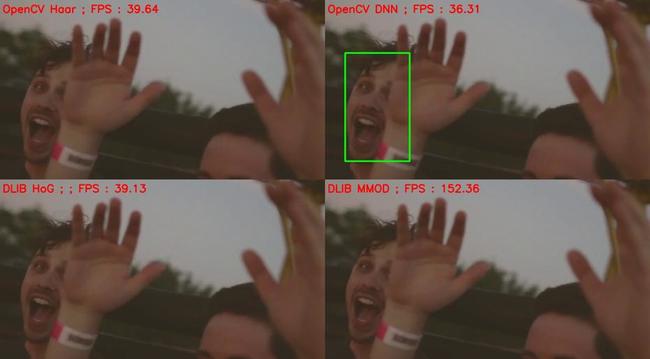
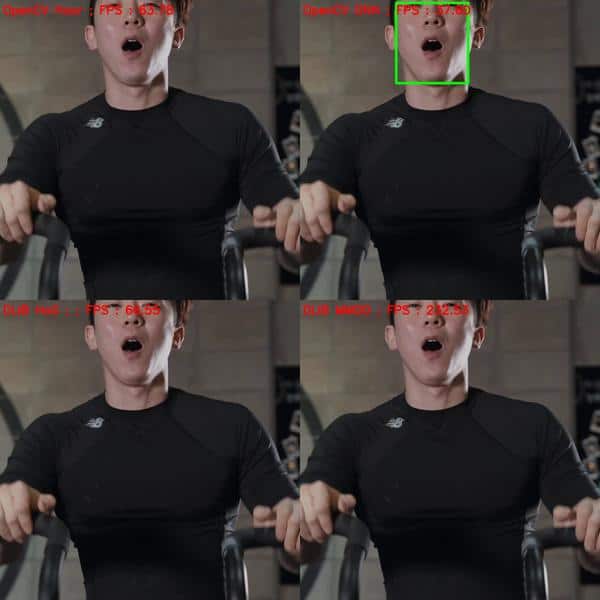
再一次看到,DNN方法比其他方法更优,OpenCV-DNN 比 Dlib-MMOD 还好一点。这是因为CNN 特征 比 HoG or Haar 更加鲁棒,稳定。
Again, the DNN methods outperform the other two, with OpenCV-DNN slightly better than Dlib-MMOD. This is mainly because the CNN features are much more robust than HoG or Haar features.
¶8. 总结
我们讨论了每个方法的优缺点。个人建议使用 OpenCV-DNN 和 Dlib-HoG 在应用和设备成本权衡中。以下我们的建议:
We had discussed the pros and cons of each method in the respective sections. I recommend to try both OpenCV-DNN and HoG methods for your application and decide accordingly. We share some tips to get started.
¶8.1 大多数的情况
General Case
在多数场景中,我们提前不知道图片大小,因此 选用 OpenCV – DNN 相当快也很精确,甚至对于小人脸也不错,各种人脸角度也可以。选用这个在大多情况下是最优的。
In most applications, we won’t know the size of the face in the image before-hand. Thus, it is better to use OpenCV – DNN method as it is pretty fast and very accurate, even for small sized faces. It also detects faces at various angles. We recommend to use OpenCV-DNN in most
¶8.2 大小中等或大一点图片
For medium to large image sizes
Dlib HoG 在 cpu上是最快的一个方法。但是它不能检测出 face size (< 70x70) 的图片。所以你得清楚使用的场景,比如自拍的话就可以。如果能使用GPU的话 dlib-MMOD 是一个最好的选择,因为它支持GPU,跑得也比较快,也能适应人脸的角度变化。
Dlib HoG is the fastest method on CPU. But it does not detect small sized faces (< 70x70). So, if you know that your application will not be dealing with very small sized faces ( for example a selfie app ), then HoG based Face detector is a better option. Also, If you can use a GPU, then MMOD face detector is the best option as it is very fast on GPU and also provides detection at various angles.
¶8.3 高分辨率图像
High resolution images
对于这些方法来说,高分辨图像都有点难度,计算时间比较长。可能采用的方法是resize图像 ( scale down the image),HoG / MMOD方法可能就识别不出了,但是可以使用 OpenCV-DNN 尝试一下。我认为也可以将图片分割开再识别呀,嘻嘻。
Since feeding high resolution images is not possible to these algorithms (for computation speed), HoG / MMOD detectors might fail when you scale down the image. On the other hand, OpenCV-DNN method can be used for these since it detects small faces.
有任何建议,欢迎在下面评论。 Have any other suggestions? Please mention in the comments and we’ll update the post with them!
¶参考
FDDB Comparison code Dlib Blog dlib mmod python example dlib mmod cpp example OpenCV DNN Face detector Haar Based Face Detector
¶TODOS
文章作者是 VIKAS GUPTA
来,看看这个是站长大佬的图片,是不是很熟悉?膜拜一哈。
我订阅后文章后,作者发的邮件内容,并没有给文章页的代码。
重要资源