¶前言
本文主要内容为博客搭建的记录与分享,我采用了Hexo博客框架,NexT主题和Gitment评论系统。本文中记录了我博客的安装流程和使用过程中的改进细节。
对Next主题版本的一些说明:我使用的是version: 5.1.0。而使用新版本的NexT v6 主题的同学,有些功能如gitment已经实现,可以直接使用V6。此V6版本对于图片的使用可能会出现问题。仅需看看我下面的2.2小节。
有时间我会将我修改后的hexo Next theme 基于version: 5.1.0主题,给个独立的git仓,放到github 上。
小技巧:在文章中可以使用
<!-- more -->手动进行截断,more上面部分将被放到主页上显示。此为Hexo 提供的方式。
下面就是用<!-- more -->截断的~~
在看安装教程的时候,发现怎么要涉及这么多东西,请大家不要担心,一步步来。同时也不用在意会不会nodejs,框架这些东西,人家已经帮我们把东西都写好了,我们做的就是改改配置文件,最多改改里面swig的模版的一些代码。最后,望大家见谅的是,我对js不太熟,有些地方不是很清楚。欢迎大家在下面评论,或者在github上开issue,共同讨论。
¶1. 安装
¶1.1 简易安装使用
使用新版本的 NexT v6 主题即可,有些功能如 gitment 已经实现。对于图片的使用可能会出现问题。仅需看看我下面的2.2小节。我使用的是 version: 5.1.0 。
¶1.2 从头安装
- 安装 nodejs,从nodejs 官网下载安装包 download page
- 安装git客户端 git
- 安装Hexo
npm install -g hexo-clihexo 中文安装文档 Hexo中文网站 - 安装NexT ,NexT是一个比较火的主题。 按官网教程NexT安装即可,官网安装和配置教程比较美滋滋。 http://theme-next.iissnan.com/getting-started.html NexT Github https://github.com/iissnan/hexo-theme-next 另外,NexT开发者的博客(最近Next 变成组织了,祝贺)http://notes.iissnan.com
Ubuntu安装记录
1 | # for Ubuntu16.04 |
ok,安装完的目录结构。
1 | . |
我对博客项目的安排是这样的,总共有两个github项目,一个放素材,一个用hexo框架生成html文件。 在上面的文件目录只能够,将source 文件夹作为一个submodule 用 git submodule
1 | # 对于我来说 |
在生成html,下面操作都在 path/to/your/github.io/project,hexo找不到node_modules
1 | # clone 项目 |
¶2. 配置
对于在NexT主页上介绍的配置我就不写了,请参考http://theme-next.iissnan.com/getting-started.html 。
下面主要对重要的和我自己修改的部分说明没有的进行配置,值得注意的是我的NexT版本是version: 5.1.0。
¶2.1 NexT官网的设置
MathJax
编辑 主题配置文件, 将 mathjax 下的 enable 设定为 true 即可。 cdn 用于指定 MathJax 的脚本地址,默认是 MathJax 官方提供的 CDN 地址。
1 | # MathJax Support |
下面测试 $\frac{d}{dx}c^n=nx^{n-1}$ $\frac{d}{dx}c^n=nx^{n-1}$
Local Search (推荐) 本地内容搜索引擎。
安装 hexo-generator-searchdb,在站点的根目录下执行以下命令:
npm install hexo-generator-searchdb --save编辑 站点配置文件,新增以下内容到任意位置:
1
2
3
4
5search:
path: search.xml
field: post
format: html
limit: 10000编辑
主题配置文件,启用本地搜索功能:1
2
3# Local search
local_search:
enable: true
¶2.2 markdown图片
网上的图片链接可以直接使用,下面对本地图片使用进行配置。
使用
安装插件npm install https://github.com/CodeFalling/hexo-asset-image --save
在 主题配置文件(不是next的_config.yml)中设置permalink: :year/:month/:day/:title/,设置 post_asset_folder: true,这主要将文件拷贝到/public文件夹。其中permalink很关键,只能这样设置。
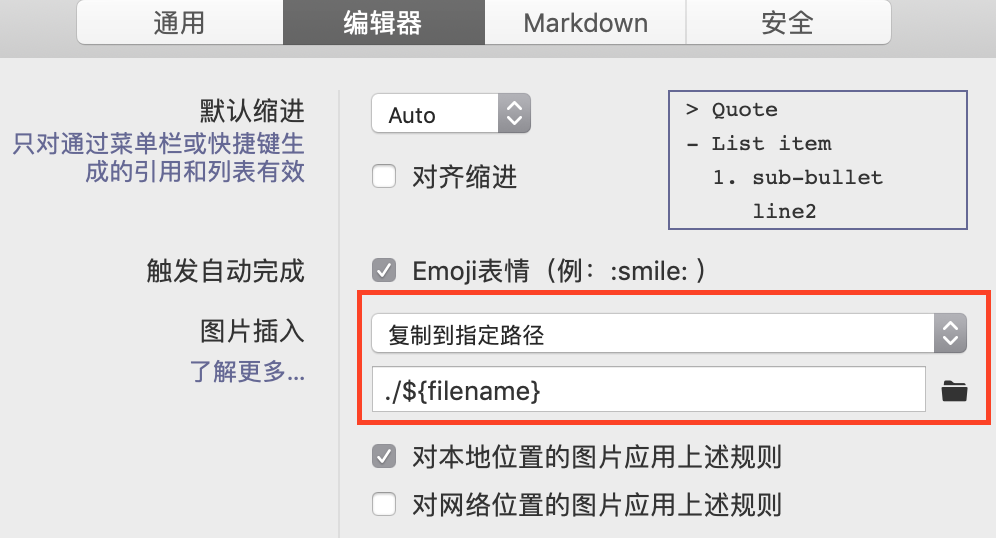
图片必须放到和md文件名字一样的同名字文件夹。 如使用Typora软件写md的话,设置一下image保存路径即可,如下。
¶2.3 代码复制
为了提高博客代码块的用户体验,仅仅代码高亮还不行,最好还能一键复制代码。故此文将讲述 Hexo NexT 主题博客的代码块复制功能配置。转 Hexo NexT 代码块复制功能
¶2.3.1 下载 clipboard.js
三方插件 clipboardjs ,相关介绍和兼容性它主页或 github 上看。
下载地址:
保存文件clipboard.js / clipboard.min.js ,目录如下: .\themes\next\source\js\src
¶2.3.2 clipboardjs 使用
也是在.\themes\next\source\js\src目录下,创建clipboard-use.js,文件内容如下:
1 | /*页面载入完成后,创建复制按钮*/ |
在.\themes\next\source\css\_custom\custom.styl样式文件中添加下面代码:
1 | //代码块复制按钮 |
¶2.3.3 引用
在.\themes\next\layout\_layout.swig文件中,添加引用(注:在 swig 末尾或 body 结束标签(</body>)之前添加):
1 | <!-- 代码块复制功能 --> |
想看效果的可以去我博客看,截图如下:
熟悉的也可以将
clipboard.min.js和clipboard-use.js合并为一个文件,再在.\themes\next\layout\_layout.swig文件中使用。当然clipboard.min.js也可以直接用三方 cdn 的方式引入也行。
¶2.4 Gitment 评论功能
集成 giment 评论系统的过程。gitment 把评论放到 github 的 issues 系统里,评论支持 md,比较适合程序员.
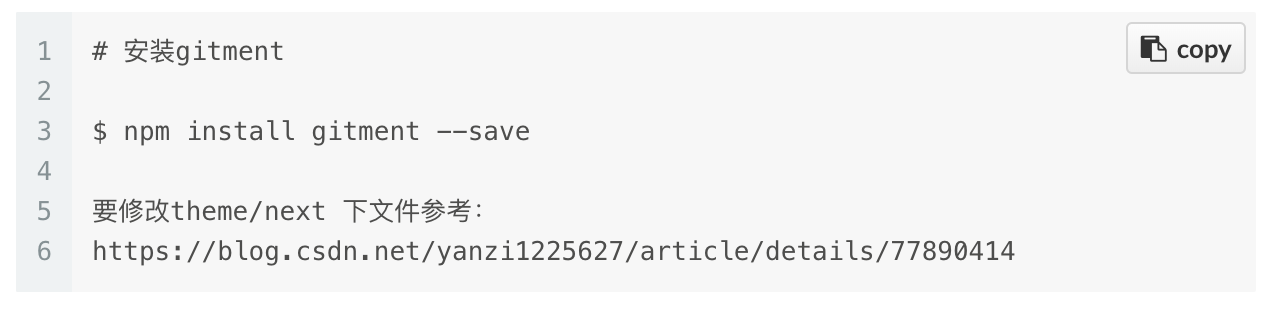
1 | # 安装gitment |
¶2.4.1 注册 OAuth Application
点击 https://github.com/settings/applications/new 注册,注意Authorization callback URL填自己的网站 url https://xxxx.github.io/. 记下 Client ID 和 Client Secret.
在新版本NexT v6里面已经支持gitment了所以你只要在github上注册一下 OAuth Application ,填上Client ID 和 Client Secret.即可
¶2.4.2 修改themes/next/_config.yml
在其中添加:
1 | # Gitment |
注意: 格式要正确,该空格的一定要空格。所有的 yourXXX 都换成自己的.
在主题的en.yml增加:
1 | gitmentbutton: Show comments from Gitment |
zh-Hans.yml增加:
1 | gitmentbutton: 显示 Gitment 评论 |
¶2.4.3 修改主题layout/_partials/comments.swig
找到这个文件里的这两行:
1 | {% elseif theme.valine.appid and theme.valine.appkey %} |
上面是最后一个elseif分支,在下面加一个elseif分支:
1 | {% elseif theme.gitment.enable %} |
加完之后下面的内容是原来的,保持不变:
1 | {% endif %} |
¶2.4.4 增加gitment.swig
在主题下layout/_third-party/comments/目录下中添加文件gitment.swig:
1 | {% if theme.gitment.enable %} |
然后在主题下layout/_third-party/comments/index.swig文件中引入 gitment.swig 文件:
1 | {% include 'gitment.swig' %} |
¶2.4.5 添加gitment.styl
在主题下source/css/_common/components/third-party/目录下添加gitment.styl文件,设置 button 的样式:
1 | #gitment-display-button{ |
然后在主题下source/css/_common/components/third-party/third-party.styl文件中引入相应的 CSS 样式即可:
1 | @import "gitment"; |
这样就 ok 了!
¶2.4.6 易错点
- 修改
themes/next/_config.yml这个文件时,格式要正确。另外,repo 是你要想创建 issues 的仓库,完全可以跟博文所放的仓库不一个。id 就写自己的 github 用户名就可以,这个用户名跟 repo 必须匹配。 - gitment 可能不支持链接地址里有中文,所以安装 gitment 前一定要参考前文把链接持久化搞成全是英文的。
- 同一篇文章需要初始化 comment 两次的问题,是因为 http://xxx.com/post/ab9bb85a.html 和点击阅读全文进去的链接 http://xxx.com/post/ab9bb85a.html#more 对 issues 来说是不同的,所以创建两次。解决方法就是
gitment.swig里 id 弄成window.location.pathname而不是document.location.href。 - 初始化评论后,可以到 github 里自己放 issues 的仓库查看 issues 是否创建成功,有时候浏览器可能会有缓存依然提示你初始化评论。一般过个两分钟就显示正常了。
¶2.4.7 参考文档
¶2.x gittalk 评论系统
https://iochen.com/2018/01/06/use-gitalk-in-hexo/
403 error:
https://zhuanlan.zhihu.com/p/350735142
申请个人worker https://dash.cloudflare.com/
¶2.x glup加速
1 | npm install --global gulp |
使用Gulp压缩Hexo博客静态资源, 加快响应速度 https://blog.csdn.net/cpohui/article/details/98525437
1 | // 设置 淘宝镜像源 |
¶2.x 字体大小
Hexo 修改字体大小 https://www.jianshu.com/p/02fbd409988c
1 | themes/next/source/css/_variables |
¶2.x 利用 Github Actions 自动部署 Hexo 博客
生成RSA密码对,部署到任务仓。 https://sanonz.github.io/2020/deploy-a-hexo-blog-from-github-actions/
¶2.5 copyright文字添加
效果 可以在md文件里面控制是否使用这个组建。

使用
在md文件中的front-head部分,设置 copyright:true如下面。 设置next/_config.yml 文件,中设置post_copyright 的选项 enable。
1 | --- |
说明 对原next的改变
对于一些原创的文本可以设置版权的声明,这个是next自带的,我进行了修改。next的_config.yml 文件,中设置post_copyright 的选项,启用它会对所有的页面添加,我多加了一个page的copyright使能判断。 对next/layout/_macro/post-copyright.swig修改。下面为修改后的文件。
1 | {% if theme.post_copyright.enable %} |
¶2.6 RSS (可选)
对一些网站的feed 的订阅 如rss,使用来进行订阅网站的rss,现在一些网站已经没有rss服务,google也停掉了google rss reader的项目,所以看你的喜好。
1 | # 安装hexo-generator-feed |
tips: 由于我博客在public文件夹下,导致hexo-generator-feed生成的地址不对。 在node_modules/hexo-generator-feed/lib/generator.js` 第35行下面添加一行:
1 | url += 'public/' |
可用此脚本替换 sed -i "36c url += 'public/';" node_modules/hexo-generator-feed/lib/generator.js
note: mac中手动修改,sed指令不一样
¶2.7 添加 fork me github
效果
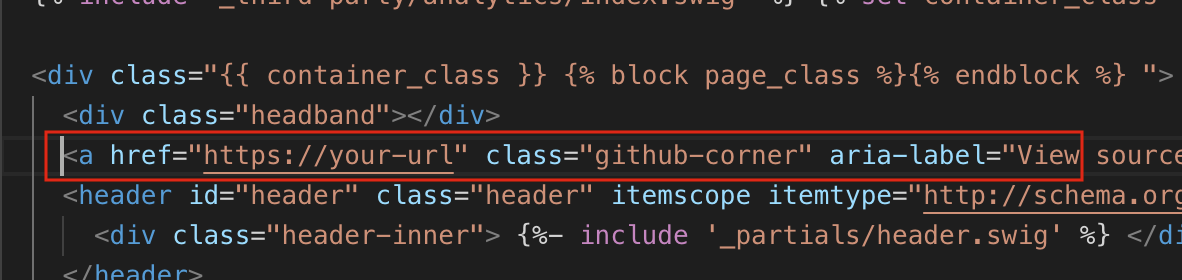
在GitHub Ribbons或GitHub Corners选择一款你喜欢的挂饰。比如下面的 github corners 在your-url填上你的 url 。
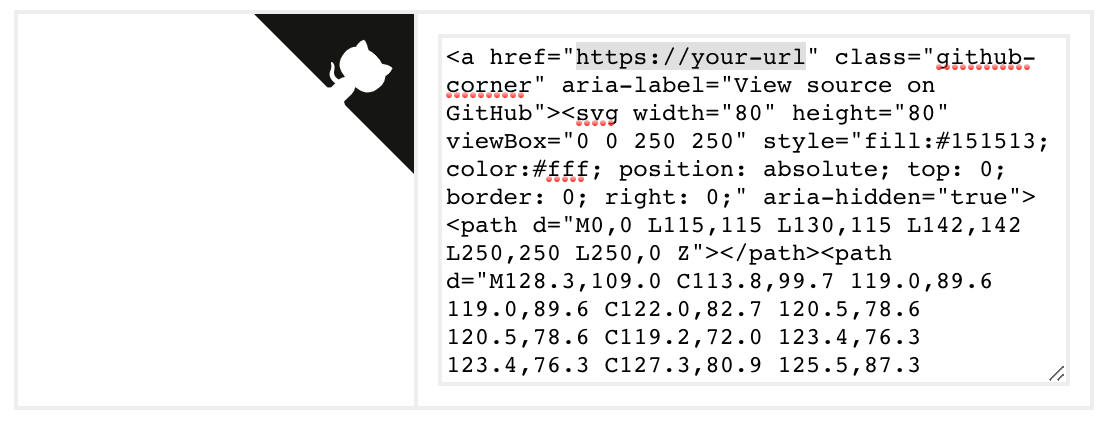
将刚刚复制的挂饰代码,添加到themes/next/layout/_layout.swig文件中,添加位置,放在<div class="headband"></div>的下方如下图。
¶2.8 添加注脚
hexo-renderer-markdown-it插件,参考
首先卸载原来的markdown渲染插件(我这里原来是marked,这是Hexo提供的默认渲染插件),然后把hexo-renderer-markdown-it装上:
1 | npm un hexo-renderer-marked --save |
然后在根目录下的_config.yml中进行相应的配置。简单的配置方法只包括设置markdown格式,这里就不详述了。高级的配置方法中包含很多可选项。
1 | ## Docs: https://github.com/celsomiranda/hexo-renderer-markdown-it/wiki |
1 | # ref https://www.dazhuanlan.com/2019/11/22/5dd6faa42d279/ |
¶2.x 添加运行时间
https://blog.csdn.net/jieruis/article/details/104024884?utm_source=app&app_version=4.21.0
¶2.x 使用Github Action 自动布置
ruanyifeng
http://www.ruanyifeng.com/blog/2019/09/getting-started-with-github-actions.html
1 | 
- 网站注册后,访问 Enter your website address 添加自己的网站地址,选择免费的服务。
1 | <script type="text/javascript" id="clustrmaps" src="//clustrmaps.com/map_v2.js?d=5Y5S382WVdS5Rafm-8SR-tSr5c6erGKcUlEEEb5LZBc"></script> |
将代码插入到 \themes\next\layout\_macro\sidebar.swig 文件的图层。
1 | <aside > |
ref: https://www.likecs.com/show-305889652.html#sc=500
¶TODO
这个TODO中放的是,我接下来对博客搭建这个项目,要做的事。平台的debug,内容的设计等等。
[ ] 续写这篇博客,后面根据内容多少看要不要拆分这个博客。
[ ] 永久化连接 permalink 这permalink 和本地图片的拷贝复制有关不好改,下面是可能的方法,由于现在的评论还比较少,后面改进。 https://github.com/rozbo/hexo-abbrlink https://github.com/EqualMa/hexo-plugin-permalink-pathed-title
[ ] gitment object ProgressEvent #170 gitment 出现问题 作者好像放弃了,所以网上有一些解决方案,(gitment issue #170)(https://github.com/imsun/gitment/issues/170)
临时使用
https://www.wenjunjiang.win/js/gitment.js这个gitment.js[ ] 编写规范 得写一个博客的编写规范。分类、标签的使用,图片的使用,公式的使用等等
¶博客编写规范
- github上有项目图片就从项目中链接过来,比如头像就是我github的头像
- 重要的图片存在本项目中
- Typora的使用
¶参考
Hexo-NexT配置超炫网页效果 好多新奇玩意儿~
原文地址
图标网站 icon8 web 比较舒服 http://fontawesome.io 标准风格 https://www.easyicon.net/ 国内的图标
补充修改进行中,,,